Running NCBI BLAST to Compare Taxonomic IDs
The Basic Local Alignment Search Tool, or “BLAST”, is a tool developed by NCBI to find and compare regions of similarity between sequences. Please see the NCBI BLAST website for further background.
BLAST can be used to check for contamination, and in conjunction with other information, can confirm or update specimen IDs from which barcodes were derived. There are two main ways this can be done:
BLAST can be run live via directly accessing the website linked above or via functions that involve live BLASTing, such as the “Verify Taxonomy” Biocode Plugin tool in Geneious which is described below. Running BLAST live takes up CPU capacity for NCBI and should therefore be limited to smaller sets of sequences (<100).
BLAST can also be run statically from a local database via the BLAST+ program developed by NCBI. For larger datasets (100+), using BLAST+ is recommended and can be easily accessed and run through the Smithsonian High Computing Cluster “Hydra”, as described below.
Running the “Verify Taxonomy” function
Background:
The Verify Taxonomy function within the Biocode Plugin utilizes the NCBI BLAST tool while also comparing all levels of taxonomy down to Genus of both the query sequence and the hit GenBank accessions. The output from the run is easy to interpret and can be viewed within Geneious or downloaded as a table (.csv, .tsv, .xls, etc.).
To do this:
Highlight assembled contigs or consensus sequences to be checked. The “Verify Taxonomy” tool is found in the Biocode Plugin dropdown menu in the Geneious Prime Toolbar.

Once “Verify Taxonomy…” is selected, a Verify Taxonomy window will appear.
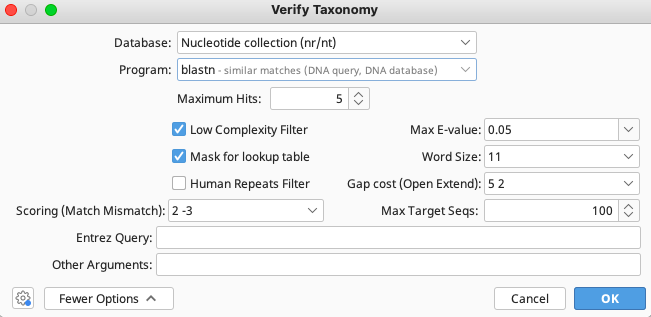
From the Verify Taxonomy window, select “Nucleotide collection (nr/nt)” as the Database and “blastn” as the Program. SIBN recommends the blastn program, as it provides a more thorough search through the NCBI nucleotide database than the other options.
The user may increase the number of Maximum Hits as they see fit as this may affect the results. However, the more hits returned, the longer the analysis will take. All else can be left as default. Click “OK”.
The function will start running and will display a progress bar. Monitor progress until all taxonomies of query sequences have been processed. A warning window can pop up to note the presence of ambiguities:
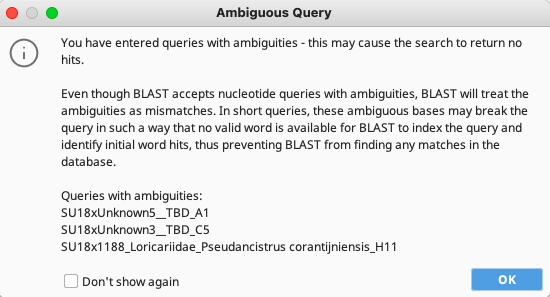
If this appears, click “OK” and the function will run in the background with no input from the user needed.
This step can take a significant amount of time depending on the number of query sequences.
Output of this function will appear as a document in the same local folder as the query sequences.
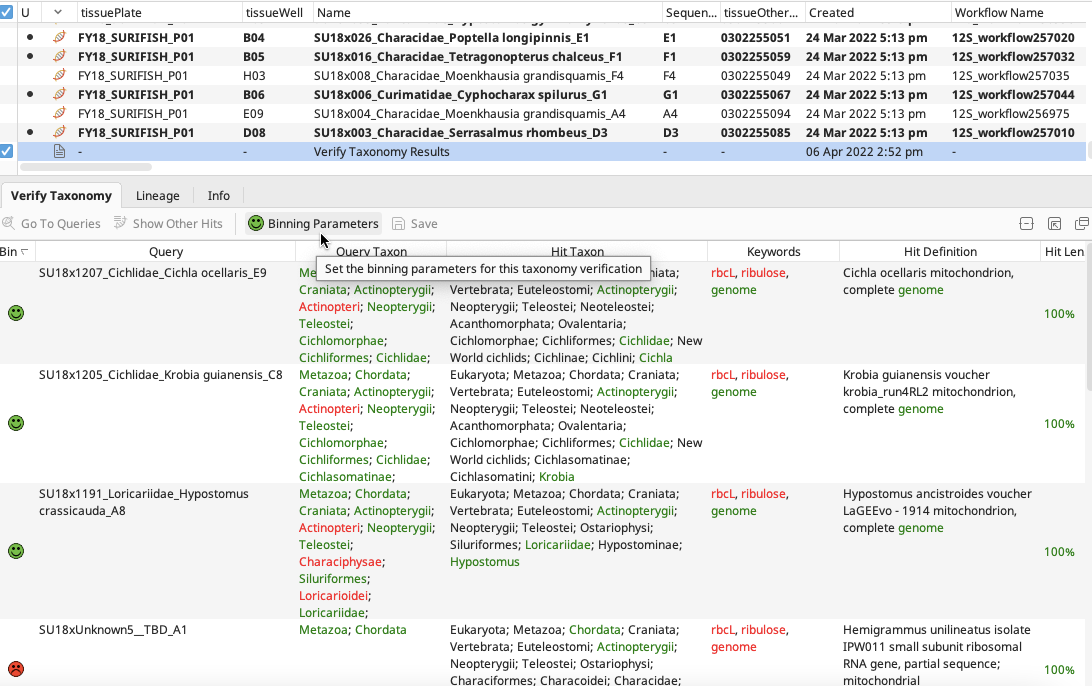
Click on the “Verify Taxonomy Results” document and the results table will appear in the Document Viewer.
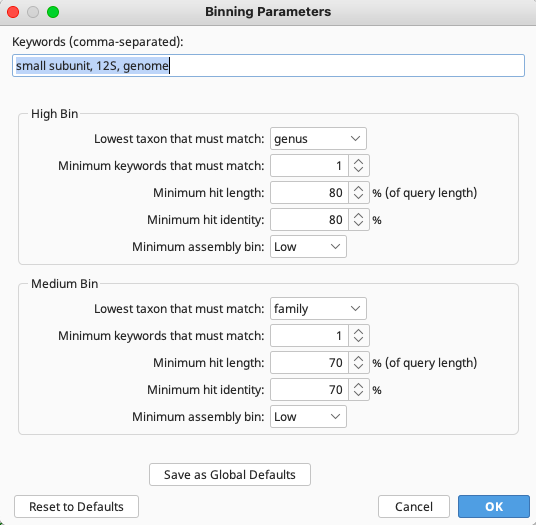
Click on “Binning Parameters” to specify details for “Keywords” (words to look for in hit seqeunce names), “High Bin” and “Medium Bin” according to what is applicable to the query sequences and preference of the user.
Within the “Verify Taxonomy Results” document in Geneious, “High Bin” is represented by a green smiley face, “Medium Bin” by yellow and “Low Bin” by red.
This document may continue to be viewed in Geneious or downloaded to a local computer as a table (highlight file, and from Geneious Toolbar go to Export>Export Documents). The color-coded face Bins on the Geneious display will show as unformatted text “High”, “Medium”, and “Low” in the downloaded file.
Running BLAST+ in Hydra
Background:
BLASTing in Hydra will run a .fasta file in the BLAST+ program, which compares sequences to a static (but regularly updated) Hydra copy of the NCBI Nucleotide database. Users will need to request access to Hydra via the instructions found on the SI Hydra Wiki page: https://confluence.si.edu/display/HPC/Logging+into+Hydra
Two files will be needed to run BLAST+ on Hydra:
a fasta file with nucleotide sequences
a job file that Hydra will use to load the program and run the needed commands.
Preparing the files
Follow the Exporting Sequences in FASTA format instructions to obtain a .fasta file with sequences to be BLASTed. It is highly recommended to include the scientficName of the sequence within the sequence name.
Create or modify a job file on the Qsub Generation Utility
When in office: (https://hydra-adm01.si.edu/tools/QSubGen/)
When teleworking: Log onto telework.si.edu, go to IT tools, find Hydra and navigate to the Qsub Generation Utility tool.
The below setting recommendations may need to be increased based on the size of the fasta file and size of the local NCBI nucleotide database, which is regularly updated and increasing in size!
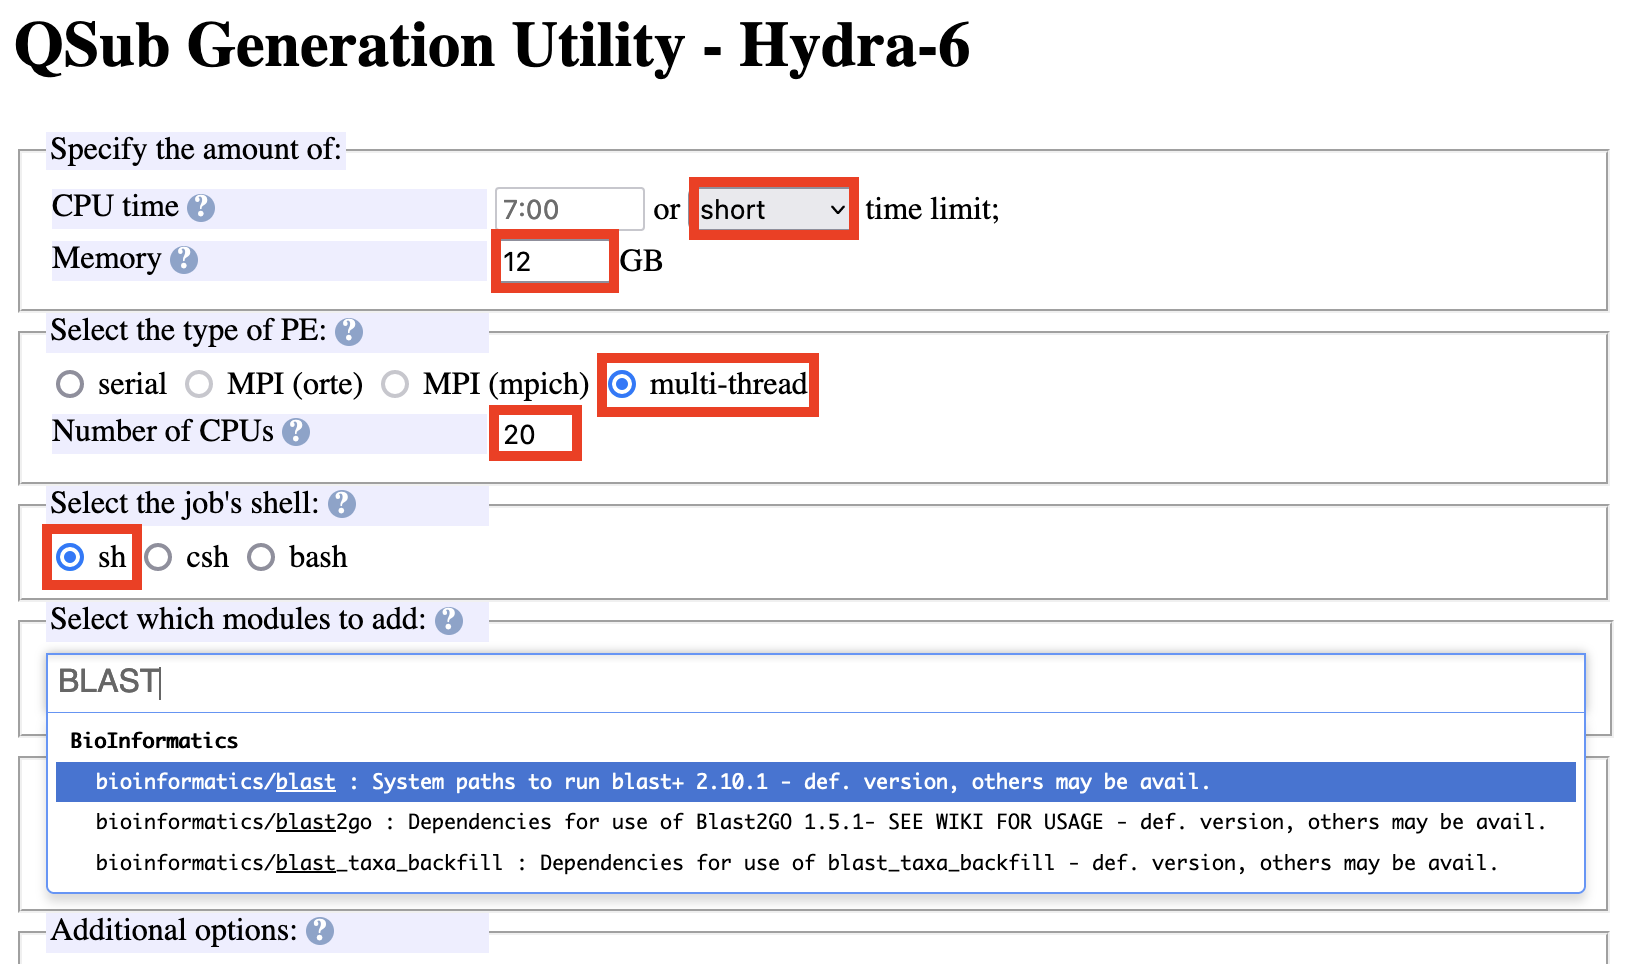
Specify CPU time to be short.
Specify memory to request, multi-thread, # of CPUs, the sh job shell.
When running the BLAST+ program, 12 GB across 20 CPUs for a total of 240 GB is recommended to begin. Once initial analyses are run, the user receives a report on how much memory the analyses took and can further specify this value in the future. Also, if a run fails, it can be due to lack of memory.
Start typing BLAST into the modules section and the path to that program will appear – select “(bioinformatics/blast)”.
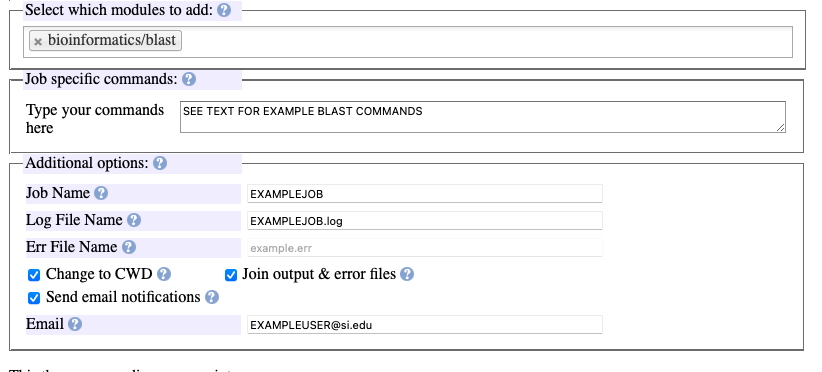
In the “Additional options” section:
Specify the desired name of the job and the .log file will be automatically named accordingly.
Select the three options “Change to CWD”, “Join output&error files”, and “Send email notifications”.
Indicate user email.
In the “Job specific commands” section:
Indicate the specific sh shell commands required to run BLAST. The following code may be copied by the user - remember to change the
-queryand-outnames below.time \ blastn \ -query NameOfConsensusSeqs.fasta \ -db nt \ -word_size 11 \ -out NameOfResultsFile.tsv \ -num_threads $NSLOTS \ -max_target_seqs 100 \ -outfmt "6 qseqid sacc staxid sscinames sblastnames evalue bitscore pident qcovs"
Specific notes on the above BLAST commands:
Please change the input
-queryand output-outcode file names bolded above to what is applicable to the user. Directory pathways to these files do not need to be specified if running the .job file in the same Hydra directory as the input .fasta file.The
-word_size 11parameter is specified so the BLAST+ program will perform a traditional blastn run, where runs of 11 base pairs from the query sequence are used to match to the NCBI nucleotide (nt) database. This results in a “deeper dive” into the database and potentially more accurate results when the query sequence is divergent from what exists in the database. If the user would like to run the faster “megablast” instead (matches runs of 28 bps from query sequence), just remove the-word_sizeparameter from the .job file entirely, as megablast is the default option for BLAST+.The
-max_target_seqsparameter specifies how many hits are returned for each query sequence. This is based on which hits are returned first, not which are the most accurate. Therefore, the higher themax_target_seqslisted, the deeper the NCBI nucleotide database is searched. The default value here is 500, this code is only needed if using a value other than 500. It is also important to remember that the higher the value of hits returned, the longer the analysis will take.The outfmt values can be further specified based on user preference. For further information on what options are available here in the BLAST+ program, see https://www.ncbi.nlm.nih.gov/books/NBK279684/ table C1, row outfmt.
The final job script will look like this:
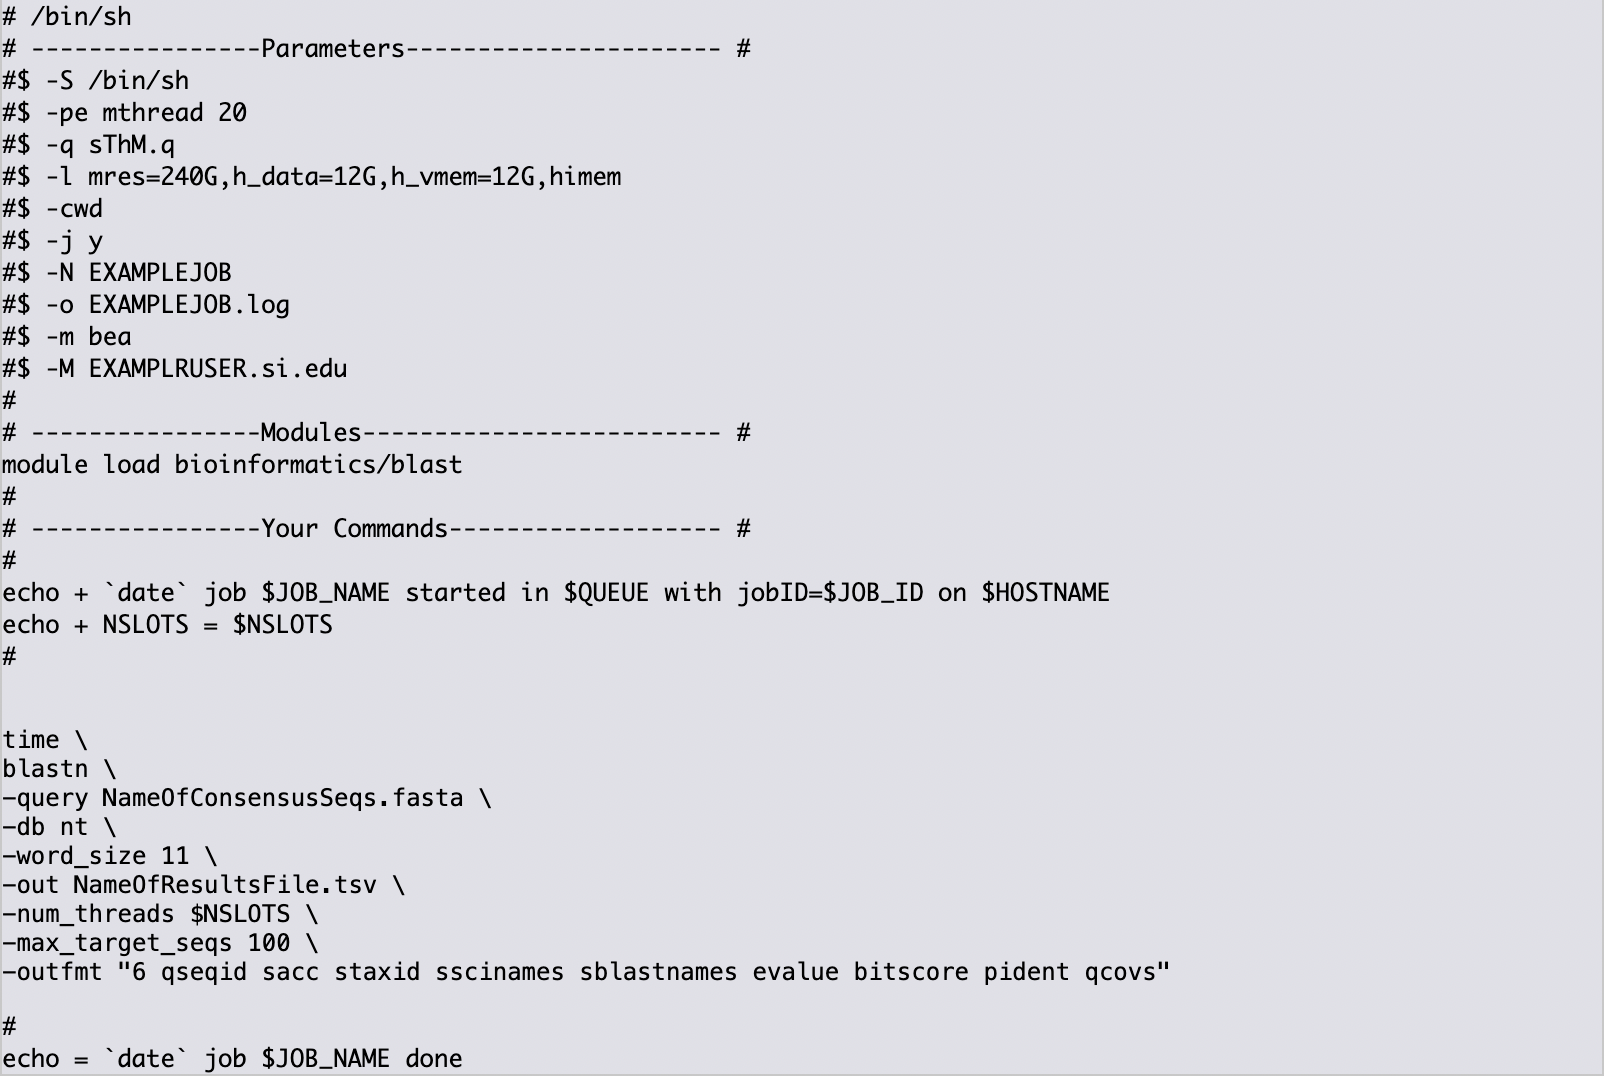
At the bottom of the QSub Generation Utility page, click the “Check if OK”, then “Save it” buttons to have the .job file downloaded to the local computer.
Note
Once a user has run a successful BLAST in Hydra, going forward, it may be easier to return to this original job file and edit it as needed, rather than produce a new one in the QSub Generation Utility.
Accessing Hydra on SI Network using a Command Line Interface (CLI)
For instruction on logging into Hydra and transferring the fasta and job files to the user’s pool/genomics directory, see https://github.com/SmithsonianWorkshops/Hydra-introduction/blob/master/hydra_intro.md.
Once the files have been transferred to Hydra via FileZilla, open Terminal (Mac) or Command Line (Windows) to access Hydra.
Within Terminal or Command Line, log onto Hydra through a secure shell session:
ssh user@hydra-login01.si.eduex:
ssh steierj@hydra-login01.si.edu
Enter password (will not show process of typing).
The user will now be logged into Hydra and be located in their home directory.
Navigate to the directory where fasta input and job files are stored.
cd /pool/genomics/user/AnyFurtherDirectoryPathwayex:
cd /pool/genomics/steierj/Blasts/FY19Fern
Type the ls command to double check if fasta input and job file are in the current directory.
Run the qsub command to begin analysis.
qsub <name of .job file>ex:
qsub FY19FernP06blast.job
The user will get emails about the start of the job and completion of the job. The completion email will contain details about how much memory and time the job took.
It may take a couple minutes for output files to appear in proper directories in FileZilla once the job completion email is received. If “CWD” option was indicated in the job file, the output tsv file will be in the same directory as the analysis was run.
Drag and drop the output tsv file from FileZilla to a local directory.
Log out of Hydra in the Terminal by typing “exit”.
Accessing Hydra When Teleworking
Note
For further instruction than what is listed here see: https://github.com/SmithsonianWorkshops/Hydra-introduction/blob/master/hydra_intro.md
Log onto telework.si.edu, navigate to the IT tools subsection, expand it, and select Hydra. Can click the links to either login node 01 or 02.
There have been past issues with certain internet browsers like Safari. Firefox browser works well.
Log onto Hydra by just typing the username, hit enter, then type the correct password (will not show the process of typing).
This will automatically place the user in the hydra home directory (~)
Navigate to the directory where BLAST will be run within the user’s pool/genomics.
cd /pool/genomics/user/AnyFurtherDirectoryPathway

ex:  cd /pool/genomics/steierj/Blasts
To build a new directory use the below command. Make sure to navigate to that new directory.
mkdir ExampleDirectoryName

cd ExampleDirectoryName

ex: mkdir FY18Surifish

    cd FY18Surifish
Once in the directory where files will be stored and BLAST will be run, download the job and fasta files to Hydra via the ffsend tool.
Use the following command to load the ffsend module onto the current command line:
module load tools/ffsend
Go to https://send.vis.ee/, upload the fasta file to be run, and copy the resulting link.
Download the fasta file to Hydra with the following command:
ffdownload <paste send.vis.ee link here>

ex: ffdownload https://send.vis.ee/download/95223dd0b9ca24f8/#jcFaCk1ouAbTXOFVWn5RVg
The file should then be downloaded to Hydra.
Repeat step this download process for the job file.
Check that both files have properly downloaded to the Hydra directory with the ls command.
Within that same directory, run the job file.
qsub <name of .job file>

ex: qsub FY18Surifish12Blast.job
The user will get emails about the start of the job and the completion of the job. The completion email will contain details about how much memory and time the job took.
Download the resulting tsv file from Hydra to the local computer with the following command:
ffupload <name of tsv file>

ex: ffupload FY18Surifish12SBlastResults.tsv
Note
ffupload is a slightly different command than what is listed in the above linked GitHub page.
This will result in a link that pastes to the command line, click that link and the send.vis.ee page with the download will pop up. Download the file to the current browser’s downloads.
Log out of Hydra by typing exit.
For an example of code using Hydra to run BLAST+ in real time, see this document.
Augmenting BLAST+ Results
As the BLAST+ output does not contain the full taxonomy (i.e. family, order, class etc.) of the BLAST hits as the live Verify Taxonomy Biocode Plugin function does, the user will need to pull the full taxonomy for the hits themselves if this is desired.
Taxonomy Fill Using Hydra and the Blast Taxa Backfill Module
To use this module to complete the taxonomic lineage for each BLAST result, 2 pieces of information are needed from the previous BLAST job.
the path of the output tsv file
the value passed to the
-outfmtparameter in the BLAST job file
Currently this module only accepts input in tsv format. The -outfmt value in the BLAST job file will need to begin with the tabular alignment view option, 6, and contain the format specifier: staxids. It will not run if those two values are not present.
Ex:
"6 qseqid sacc staxids sscinames bitscore pident qcovs"
Below is an example job file that can be copied and edited to fit the user’s needs
# /bin/sh
# ----------------Parameters---------------------- #
#$ -S /bin/sh
#$ -pe mthread 8
#$ -q sThC.q
#$ -l mres=48G,h_data=6G,h_vmem=6G
#$ -cwd
#$ -j y
#$ -N Example_blast_taxa_backfill.job
#$ -o ../logs/Example_blast_taxa_backfill.log
#
# ----------------Modules------------------------- #
module load bioinformatics/blast_taxa_backfill
#
# ----------------Your Commands------------------- #
#
echo + `date` job $JOB_NAME started in $QUEUE with jobID=$JOB_ID on $HOSTNAME
#
echo + NSLOTS = $NSLOTS
#
blast_taxa_backfill.py \
     path/to/example/input.tsv \
     path/to/example/output.tsv \
     "6 qseqid sacc staxids sscinames bitscore pident qcovs"
#
echo = `date` job $JOB_NAME done
Edit the -N and -o parameters to reflect the job name as well as name and location of the log files. It is important to note that under blast_taxa_backfill.py the order of parameters is important. This program is position dependent, meaning that parameter flags are not needed. Instead, the program recognizes the first option passed to it as input, second as output, and third as -outfmt value.
If the software fails, check the log file as the exception handling should report where it went wrong.
Taxonomy Fill Using R and Taxonimizr Package
A pipeline in RStudio has been created utilizing the “taxonomizr” R package to take the locally downloaded BLAST+ tsv output from Hydra and associate NCBI taxonomy with each BLAST hit. See this link to copy the raw code and save as a Rmd file to run in RStudio.
Please note that certain text in the script such as working directory pathway and file names will need to be changed as applicable. The user will also need to download the NCBI Taxonomy database, which is detailed in the script.
Once taxonomy data has been added to the BLAST+ results, it is recommended that this file be converted to an xlsx file and a pivot table be created to digest the information.