Annotating Sequences for GenBank Submission
When submitting sequences through the Geneious GenBank Submission Plugin that either do not encode proteins or have multiple components, such as pseudogenes of coding barcodes or the chloroplast psbA-trnH intergenic spacer, the automated “Add Gene & CDS features” button cannot be used. Consensus sequences must be annotated by hand in Geneious Prime before using the plugin. Please keep in mind that any rRNA sequences (such as 18S, 16S, 23S, 28S, ITS, etc.) cannot be submitted through Geneious Prime and must go through the GenBank Submission Portal.
For additional information on annotating sequences, see the Geneious Prime tutorial.
Initial Annotation Tips
Annotate aligned consensus sequences rather than assembled contigs or individual sequences. This saves time in the long run as bulk annotations can be done across all aligned sequences at once. SIBN recommends using the MUSCLE Alignment option in Geneious Prime.
If annotating a taxonomically diverse set of sequences that will not all align well, multiple alignments may need to be done, each annotated separately.
Ensure there are no errors in the alignments (misalignments) before bulk annotating. Also ensure that the majority of sequences begin on the same base pair if annotating a partial coding sequence (such as psbA).
If annotating an alignment of sequences for which there are multiple components, such as the psbA-trnH intergenic spacer, it may be helpful to insert into the alignment an annotated sequence from a previous project or one from a GenBank BLAST result to use as a guide. A GenBank example can be downloaded with annotations to use in an alignment in Geneious. See Download Annotated GenBank Example instructions to download an annotated example from GenBank.
Here are some example accessions that demonstrate what annotations are required to submit these sequences to GenBank.
PsbA-trnH Intergenic Spacer
Example GenBank record of a psbA-trnH intergenic spacer: https://www.ncbi.nlm.nih.gov/nuccore/MZ478431
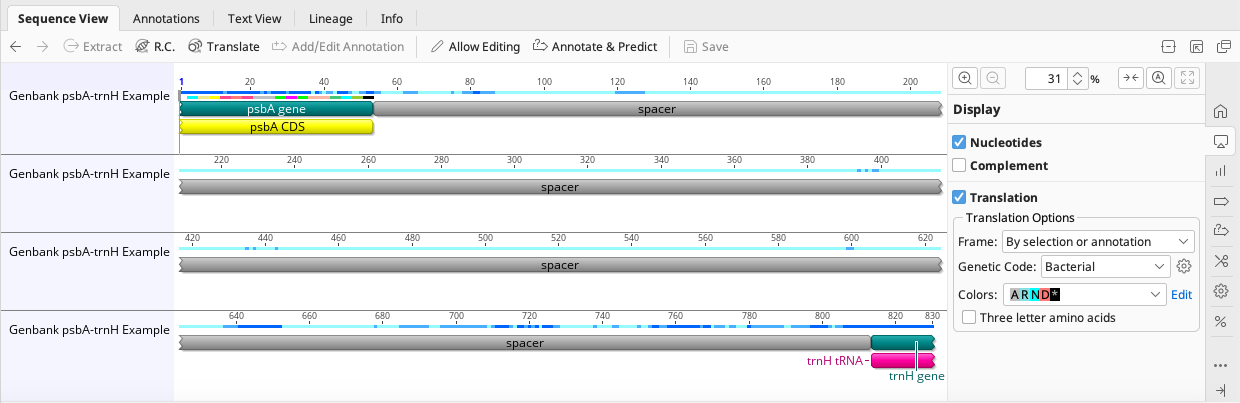
As seen in the above example, the psbA-trnH intergenic spacer barcode region needs multiple annotations. The full psbA-trnH barcode marker will have partial psbA coding sequence, the intergenic spacer, and partial trnH gene sequence. This above example can be downloaded with annotations and used as a reference.
Annotations to be added to the psbA-trnH intergenic spacer:
Part of sequence |
Type of Annotation |
Annotation Properties (Name: Value) |
|---|---|---|
psbA |
Gene |
gene: psbA |
psbA |
CDS |
gene: psbA product: photosystem II protein D1 codon_start: 3 transl_table: 11 |
psba-trnH spacer |
Misc Feature |
note: psbA-trnH intergenic spacer |
trnH |
Gene |
gene: trnH |
trnH |
tRNA |
gene: trnH product: tRNA-His |
Note that the coding portions of a sequence require two types of annotations: the Gene annotation and whatever annotation applies to the function of the coding sequence (CDS or tRNA). Within the CDS annotation, the “transl_table” property will always be 11 (“The Bacterial, Archaeal, and Plant Plastid Code”), and when the full psbA-trnH sequence is present, the codon_start value will typically be 3.
Pseudogenes
Example GenBank record of a confirmed pseudogene of a coding sequence (sequence has internal stop codons resulting from high quality traces and is reproducible): https://www.ncbi.nlm.nih.gov/nuccore/MT966286.1
Annotations to be added to a confirmed pseudogene:
Part of sequence |
Type of Annotation |
Annotation Properties (Name: Value) |
|---|---|---|
entire sequence |
Gene |
gene: ABBRIVIATION OF GENE (ex: matK) note: FULL NAME OF GENE (ex: maturase K) pseudogene: unknown |
The annotation /pseudogene:”unknown” indicates that the method of pseudogenization is unknown. If the method is known, see the GenBank feature table qualifier list for more information on a suitable annotation.
For a possible pseudogene of a coding sequence (sequence has internal stop codons but may be due to sequence error): https://www.ncbi.nlm.nih.gov/nuccore/FJ216667
Annotations to be added to a possible pseudogene:
Part of sequence |
Type of Annotation |
Annotation Properties (Name: Value) |
|---|---|---|
entire sequence |
Gene |
gene: ABBREVIATION OF GENE (ex: matK) note: FULL NAME OF GENE (ex: maturase K) pseudo (no value for this property) |
If working with any other non-coding or multiple component sequence that is new to the user, the best way to figure out which annotations are needed is to BLAST the sequence and view the annotations associated with the most recently published hits resulting from the search in NCBI.
Download Annotated GenBank Example
To download an annotated example from GenBank:
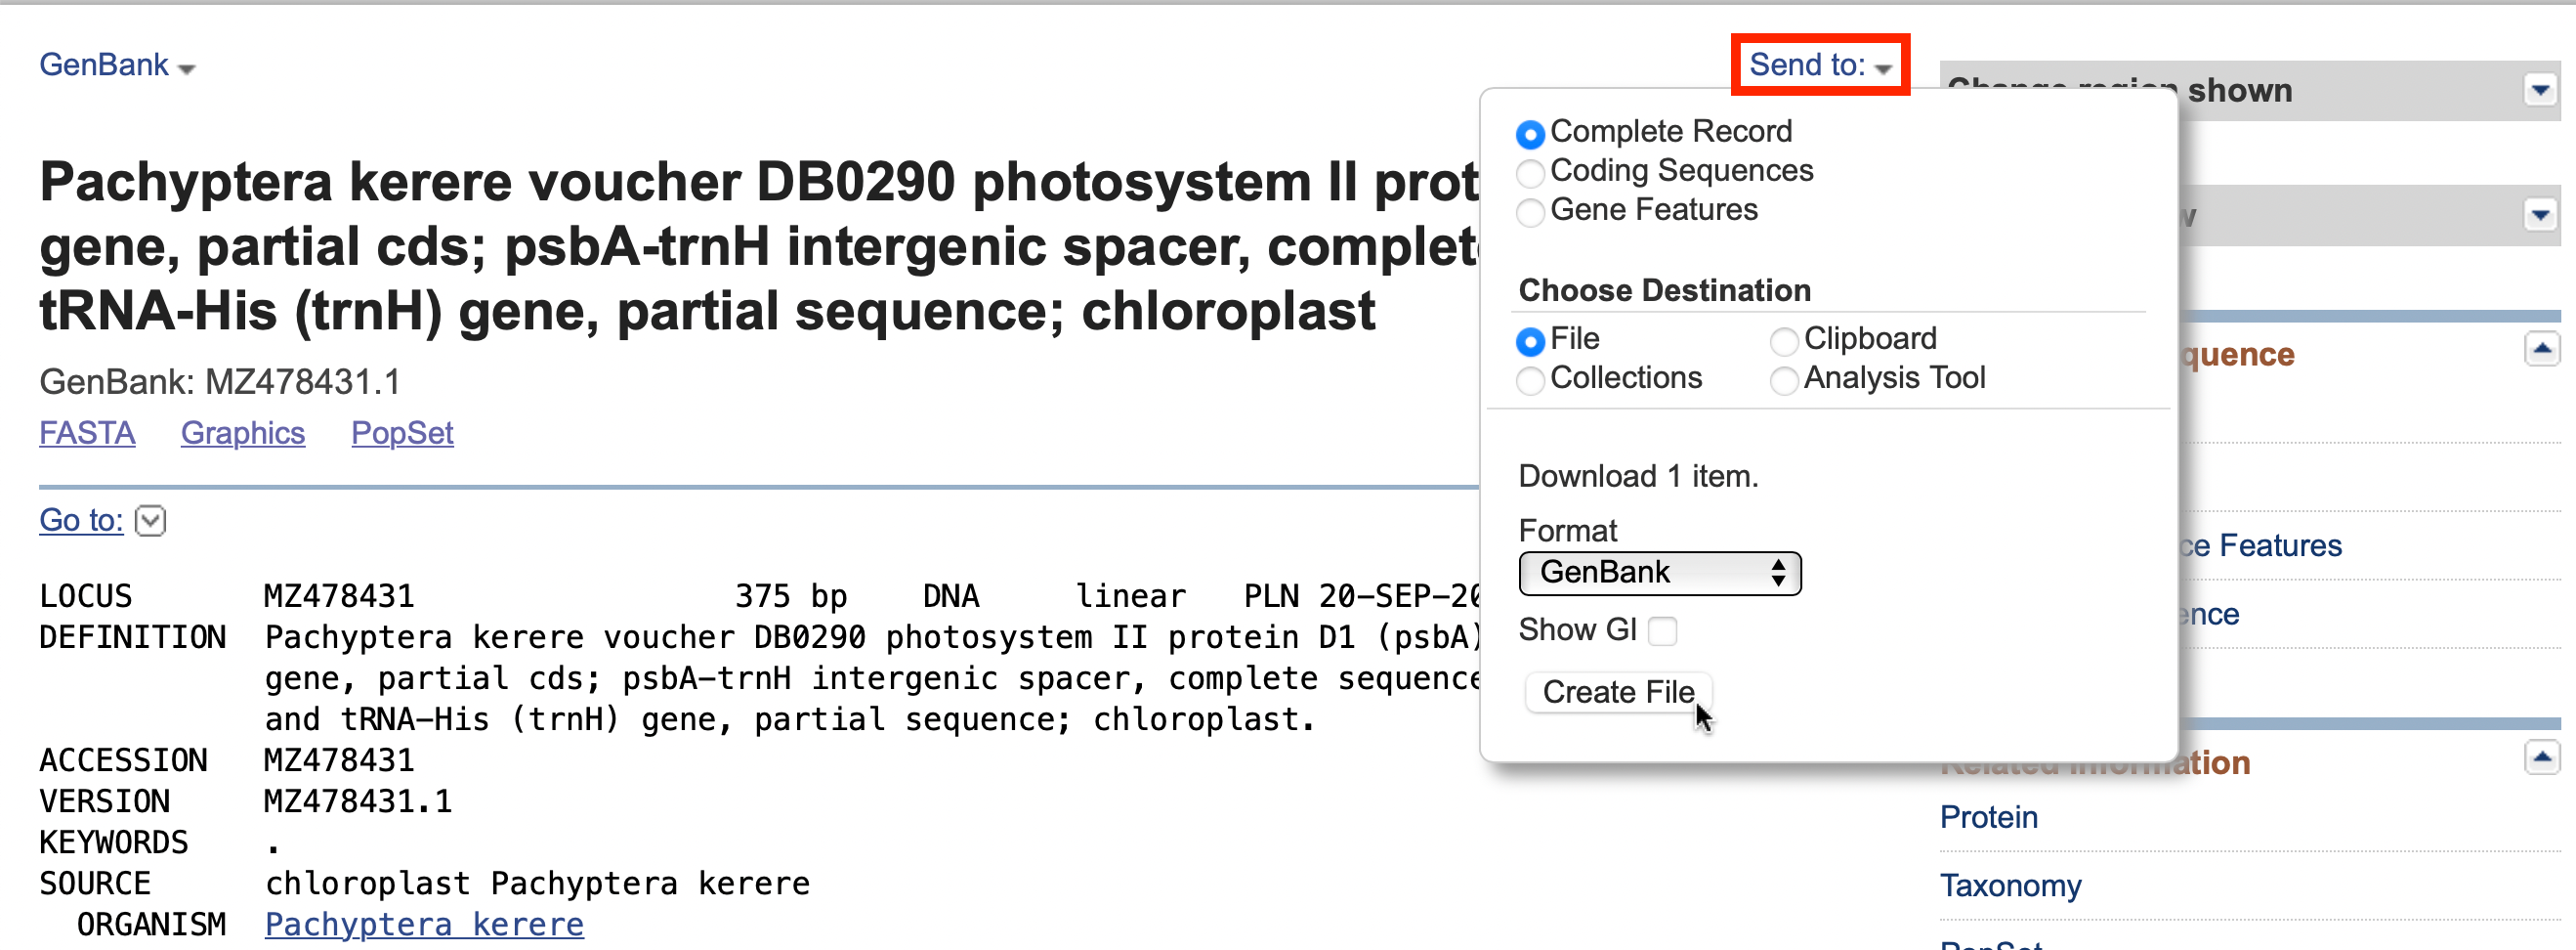
Navigate to the Genbank record that will serve as an annotation reference.
In the upper right of the record, click the “Send to:” link.
Choose “Complete Record”, “File”, and from the dropdown list select “GenBank”.
Click “Create File” to have the annotated GenBank record download.
This record can be opened in Geneious Prime. It will have all annotations noted in the format Geneious uses and can be used as a reference in a sequence alignment.
Adding an Annotation to Multiple Sequences
Below are steps to add a single CDS (coding sequence) annotation to an alignment of psbA-trnH sequences. Follow these steps to add any annotation.
To annotate an alignment of consensus sequences, from the Alignment View tab of the Geneious Prime Document Viewer, highlight the portion of the sequences to be annotated. If the sequence has only one component (pseudogenes), highlight the entire alignment.
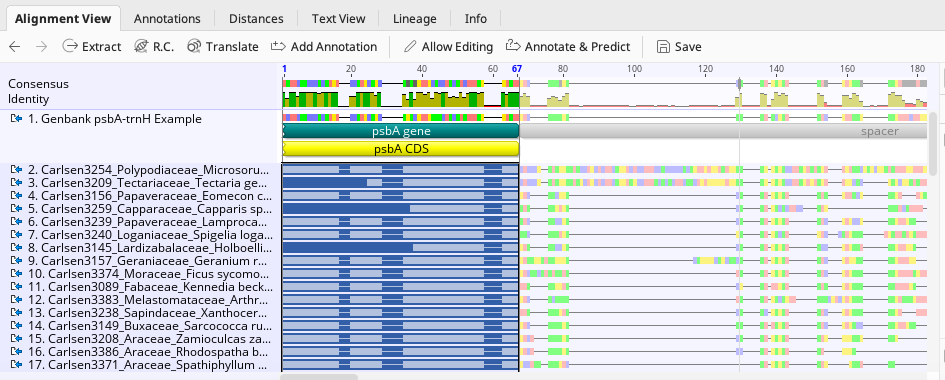
In this example, an annotated sequence from GenBank was inserted into alignment to act as a guide.
Once the sequences are selected, click the “Add Annotation” button.
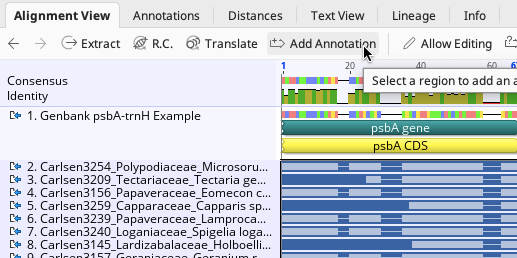
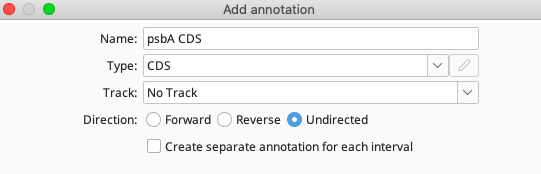
This will bring up the Add annotation window. For this example:
In the Name box, enter any name that describes the annotation. This name will not be pushed to GenBank. Here, “psbA CDS” was used.
For Type, select “CDS” from the dropdown menu.
Make sure that Track is “No Track”, and select “Undirected” for Direction. This will also apply to any other annotation listed in the above tables.
In the Properties section, click the Add button to bring up the Add Property window. For this example:
For “Name”, enter “gene”, and for “Value” enter “psbA”. Click “OK”.

Repeat the above “Add Property” steps for each property listed for the psbA CDS annotation in the above table.
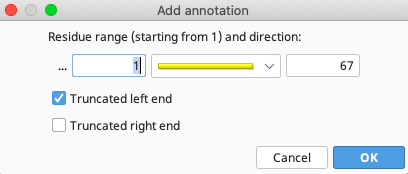
Finally, in the Intervals section, select the number range that is already there, and click “Edit”.
For the psbA annotations (this example), the “Truncated left end” option is selected. For trnH annotations (not shown in example), “Truncated right end” is selected. For spacer annotations (not shown in example), no truncation is needed, as the entire spacer sequence should be present. Click “OK”.
For pseudogene sequences where only one annotation is needed, select both “Truncated left end” and “Truncated right end”. Click “OK”.
The completed window for adding the psbA CDS annotation should look like this:
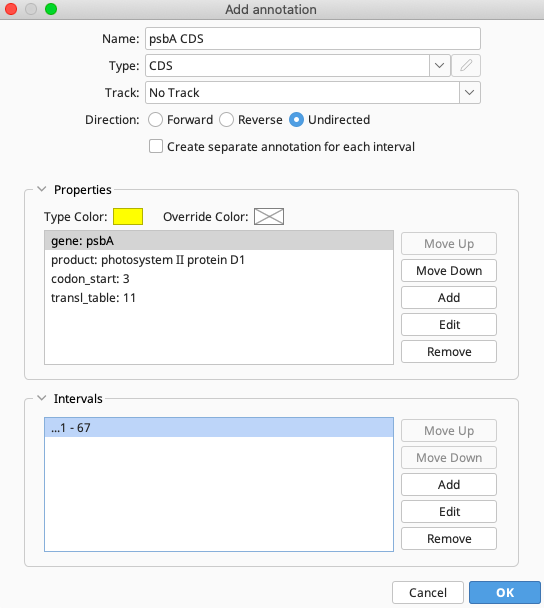
Click “OK”, and the psbA CDS annotation will be added to the highlighted portion of the alignment.
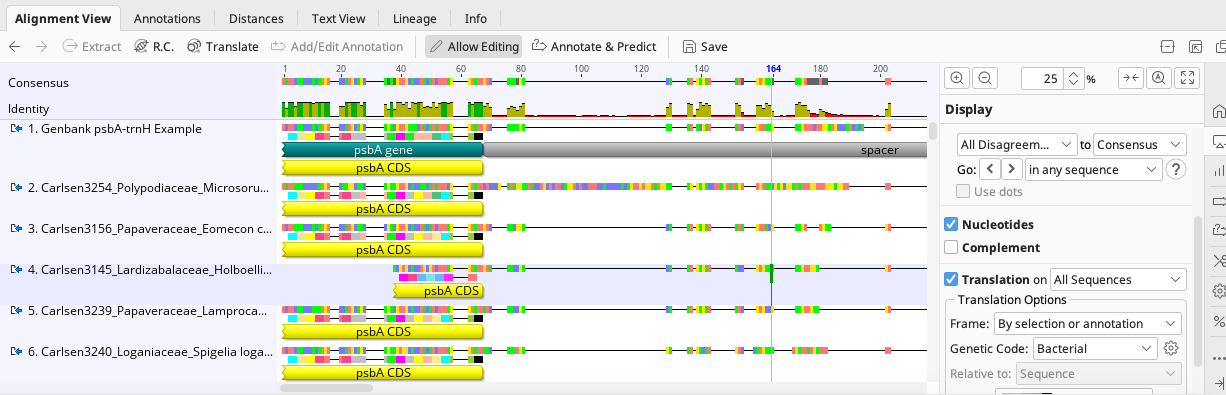
Repeat the above steps for any other annotations needed.
When creating a CDS annotation, the “codon_start” property is determined by which base pair the alignment starts on and may have to be altered for individual sequences that are shorter on the 5’ end of the sequence (see sequence #4 in the above screenshot).
For the psbA-trnH spacer sequence, after all applicable annotations are added to the consensus sequences in alignment, some slight edits to the annotation intervals on individual sequences may be needed if sequences are shorter on the 3’ or 5’ ends. See the following screenshot for an example.
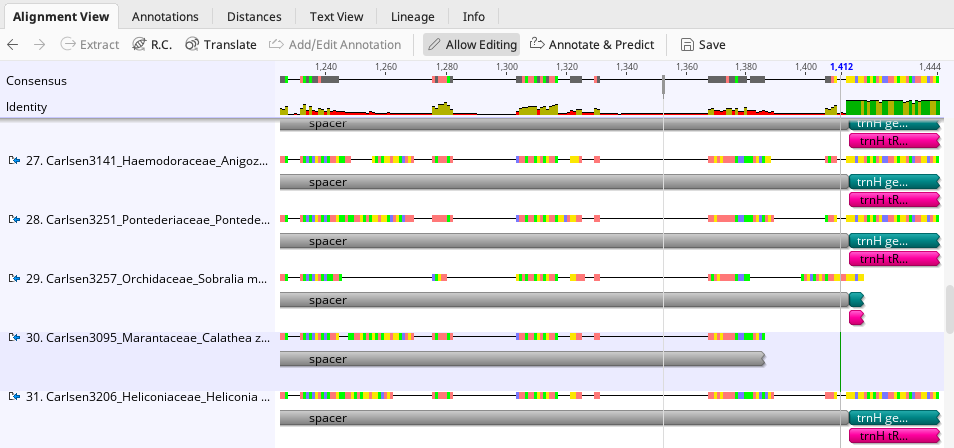
In the above image, sequence #30 is shorter on the 3’ end and does not have trnH gene sequence. This spacer annotation interval was edited to “Truncated right end”, as the spacer sequence is not complete.
Individual annotations can also be highlighted and dragged to change interval coverage on the sequence when needed.
Finally, click the “Save” button to save the annotations on the alignment.
Once saved, all the annotations should be applied to the individual consensus sequences that went into the alignment.
For example, a single annotated psbA-trnH consensus sequence should now look like this:
Bulk Edits to Annotations
Use the Annotations tab in the Geneious Prime Document Viewer to work with all completed annotations in bulk, organized by annotation type.
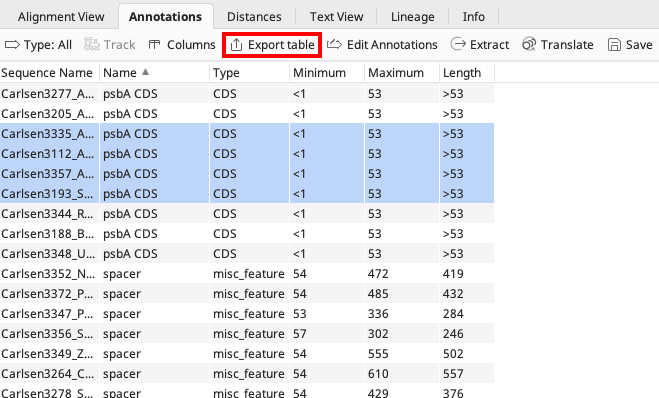
If any annotations need to be edited in bulk, highlight the annotations from the Annotations Tab. It is then possible to delete all highlighted annotations or click Edit Annotations. Only annotation name, type, and properties can be bulk edited. Annotation intervals cannot be bulk edited after annotation has been added to sequence.
Click Export Table to download a .tsv file with the displayed columns of annotation interval data. This file can be manually converted to a GenBank feature table document if there is a need to add/edit annotation data for already published GenBank sequences.
Submitting Annotated Sequences to GenBank
Be sure to follow this manual annotation procedure for all non-coding or multiple component sequences to be submitted to GenBank.
To submit to GenBank, follow the GenBank Upload Pipeline 2: Geneious Prime GenBank Submission Tool procedure, but note the following:
Rather than selecting “Add Gene & CDS features using fields”, select the option above it: “Include Features/Annotations”. This will ensure the annotations just added through this protocol will be submitted with the sequence. Make sure that “Also include annotations in tracks” is NOT selected.